Process Control Block
它放在RAM(运行内存)里并包含着进程的信息。每个进程都把自己的信息放在task_struct数据结构里。
Take kernel 4.14 as example.
从这时候发现,还是Chinese更亲切
task_struct 结构体定义在
5.X的内核又改了,task_struct 位置不在这个头文件里
##调度数据成员##
1 | (1) volatile long states; |
Process Control Block
它放在RAM(运行内存)里并包含着进程的信息。每个进程都把自己的信息放在task_struct数据结构里。
Take kernel 4.14 as example.
从这时候发现,还是Chinese更亲切
task_struct 结构体定义在
5.X的内核又改了,task_struct 位置不在这个头文件里
##调度数据成员##
1 | (1) volatile long states; |
https://www.w3school.com.cn/、https://www.runoob.com/ 、https://www.sololearn.com/ 用来学习入门级的编程基础,是非常不错的。最推荐sololearn,尤其是英语一般的又希望英语也不落下的。
可惜的是 国内访问不了sololearn
Markdown 支持许多HTML 5标签。—> 这和Markdown的解释器有关
Vincent 长庚
测试了下,支持article 和 aside 标签
apache和httpd是一个,到apache2后就叫httpd了。
Nginx(“engine x”)是一款开发高性能的Web和反向代理服务器,也是一个IMAP/POP3/SMTP代理服务器。
DOM
定义了访问 HTML 和 XML 文档的标准
1 | <!DOCTYPE html> |
| 方法 | 描述 |
|---|---|
| getElementById() | 返回带有指定 ID 的元素。 |
| getElementsByTagName() | 返回包含带有指定标签名称的所有元素的节点列表(集合/节点数组)。 |
| getElementsByClassName() | 返回包含带有指定类名的所有元素的节点列表。 |
| appendChild() | 把新的子节点添加到指定节点。 |
| removeChild() | 删除子节点。 |
| replaceChild() | 替换子节点。 |
| insertBefore() | 在指定的子节点前面插入新的子节点。 |
| createAttribute() | 创建属性节点。 |
| createElement() | 创建元素节点。 |
| createTextNode() | 创建文本节点。 |
| getAttribute() | 返回指定的属性值。 |
| setAttribute() | 把指定属性设置或修改为指定的值。 |
innerHTML 属性
innerHTML 属性可用于获取或改变任意 HTML 元素,包括 和
。1 | <!DOCTYPE html> |
1 | <!DOCTYPE html> |
修改
1 | <!DOCTYPE html> |
事件
1 |
导航
1 |

1 | <!DOCTYPE html> |
JavaScript
BootStrap
CSS
GitBook 是一个基于 Node.js 的命令行工具,可使用 Github/Git 和 Markdown 来制作精美的电子书
Learn JavaScript
How to Make an Operating System
GitBook支持输出多种文档格式:
静态站点:GitBook默认输出该种格式,生成的静态站点可直接托管搭载Github Pages服务上;
PDF:需要安装gitbook-pdf依赖;
eBook:需要安装ebook-convert;
单HTML网页:支持将内容输出为单页的HTML,不过一般用在将电子书格式转换为PDF或eBook的中间过程;
JSON:一般用于电子书的调试或元数据提取。
使用GitBook制作电子书,必备两个文件:README.md和SUMMARY.md。
DOM
定义了访问 HTML 和 XML 文档的标准
1 | <!DOCTYPE html> |
| 方法 | 描述 |
|---|---|
| getElementById() | 返回带有指定 ID 的元素。 |
| getElementsByTagName() | 返回包含带有指定标签名称的所有元素的节点列表(集合/节点数组)。 |
| getElementsByClassName() | 返回包含带有指定类名的所有元素的节点列表。 |
| appendChild() | 把新的子节点添加到指定节点。 |
| removeChild() | 删除子节点。 |
| replaceChild() | 替换子节点。 |
| insertBefore() | 在指定的子节点前面插入新的子节点。 |
| createAttribute() | 创建属性节点。 |
| createElement() | 创建元素节点。 |
| createTextNode() | 创建文本节点。 |
| getAttribute() | 返回指定的属性值。 |
| setAttribute() | 把指定属性设置或修改为指定的值。 |
innerHTML 属性
innerHTML 属性可用于获取或改变任意 HTML 元素,包括 和
。1 | <!DOCTYPE html> |
1 | <!DOCTYPE html> |
修改
1 | <!DOCTYPE html> |
整理wiki blog的方法
jekyll
hexo
docsify
mdwiki
gitbook
gitbook
npm install -g cnpm
cnpm install -g gitbook-cli
docker search -s 3 gitbook
docker pull fellah/gitbook
docker run -v /home/m/gitbook/my:/srv/gitbook -v /home/m/gitbook/my/html:/srv/html fellah/gitbook gitbook build . /srv/html
docker search -s 3 nginx
docker pull nginx
docker run –name my-nginx -v /home/m/gitbook/my/html:/usr/share/nginx/html -d -p 8080:80 nginx
So open IP:8080 to start a Web page .
How to make pdf
nohup python -m SimpleHTTPServer [port] &
SimpleHTTPServer is a module of Python.
The index.html will should be set as the homepage.
This is also a good idea to share your files.
If there isn’t an index.html page, there will shows all the files in the browser page.
:)
sudo apt-get install docker.io
sudo gpasswd -a your_user_name docker               #加入用户组
sudo service docker restart
newgrp - docker             #使用新用户组,或者也可以断开终端重连生效
docker version              #查看docker版本信息
docker下各文件默认存放在/var/lib/docker下
du -h --max-depth=1 /var/lib/docker                #查看docker目录大小

docker search licheepi               #搜索镜像
docker pull zepan/licheepi           #下载镜像
docker run zepan/licheepi apt-get install -y xxx             #在镜像中执行命令,安装某软件
docker commit -m="install something" -a="zepan"  container_id zepan/licheepi
docker login
docker push  zepan/licheepi
交互式启动
docker run -i -t learn/tutorial /bin/bash        //开启一个交互式虚拟终端
    -i    交互式
    -t     虚拟终端
    -d    后台
    -P    端口映射

docker port  id    //查看端口映射情况

docker inspect  id    //查看容器详细状态
后台启动
docker run -d learn/tutorial /bin/sh -c "while true; do echo hello world; sleep 1; done"
返回容器id:350807154a3dd17309b23bb9a9a9897dd3fc91667a7d176aca42f390808e3019


docker logs 3508 或 blissful_lamport
docker logs -f    xxxx        //类似tail -f

docker stop 3508        //通过发送信号方式停止
docker kill 3508           //kill方式停止
docker start 3508        //start -i  交互式执行
docker restart 3508


docker remove 3508
docker rm `docker ps -a -q`        //删除所有容器
主机容器互拷数据
docker cp id:/xxx/xx   /yyy/yy/
docker cp  /yyy/yy/    id:/xxx/xx
开启容器的ssh
docker run -d -p 6666:22 zepan/licheepi /usr/sbin/sshd -D
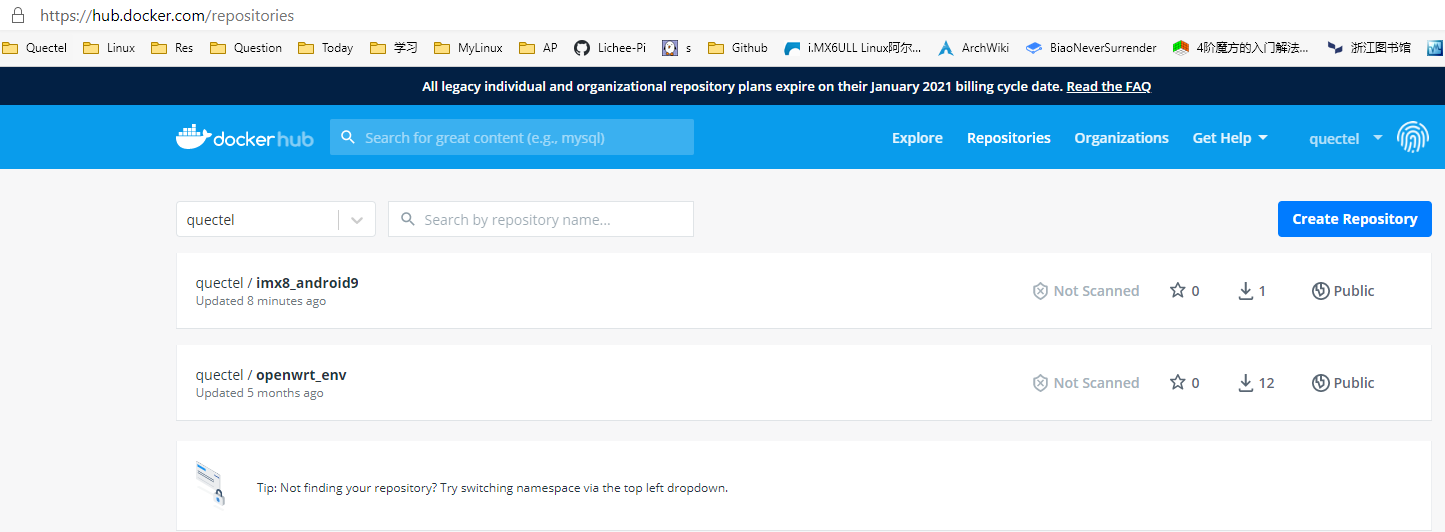
android@q-OptiPlex-7070:~$ docker login
Login with your Docker ID to push and pull images from Docker Hub. If you don't have a Docker ID, head over to https://hub.docker.com to create one.
Username: quectel
Password:
WARNING! Your password will be stored unencrypted in /home/android/.docker/config.json.
Configure a credential helper to remove this warning. See
https://docs.docker.com/engine/reference/commandline/login/#credentials-store

Login Succeeded


android@q-OptiPlex-7070:~$ docker images
REPOSITORY            TAG                 IMAGE ID       CREATED          SIZE
ubuntu                16_jdk1.8           0fc8046dc8e7   10 minutes ago   2.93GB

docker tag ubuntu:16_jdk1 quectel/imx8_android9

docker push quectel/imx8_android9
========================
e 值 in
模式1)
    command1
    command2
    command3
;;
模式2)
    command1
    command2
    command3
;;
*)
    command1
    command2
    command3
;;
esac
例子
#!/bin/bash
var=quectel

echo $var

printf "Input a character: "
read -n 1 char
case $char in
   [a-zA-Z])
       printf "\nletter\n"
       ;;
   [0-9])
    printf "\nDigit\n"
       ;;
   [0-9])
       printf "\nDigit\n"
       ;;
   [,.?!])
       printf "\nPunctuation\n"
       ;;
 *)
    printf "\nerror\n"
esac

------------

#!/bin/bash
var=quectel

echo $(ls)

echo `pwd`


v2=hello"quectel"!

echo $v2


arr=(1 2 3)

echo ${arr[2]}
echo ${arr[@]}
echo ${#arr[*]}
Dim WshShell
Set WshShell=WScript.CreateObject("WScript.Shell")
WshShell.Run "cmd.exe"
WScript.Sleep 1500
WshShell.SendKeys  "ssh m@10.66.125.234"
WshShell.SendKeys  "{ENTER}"
WScript.Sleep 1500
WshShell.SendKeys "m"
WshShell.SendKeys "{ENTER}"
Hard to clarify…
locale 是Ubuntu/Centos 用于语言环境本地化。
远程SSH 连了自己平板电脑上的WSL环境,Ubuntu环境的工作OK,但是Debian的WSL环境却出现了输入中文字符,VIM里出现无法识别的情况,出现了各种方块。
和locale有关。
之前在EC25E上移植TMUX,没成功,最后也是这个问题需要配置。
实际上Debian上支持locale,执行dpkg-reconfigure locales 也能配置,但是返回有报错,并且最终没有生效。
直接修改/etc/default/locale ,重启后也不行。
apt-get remove --purge locales -y
apt-get install locales -y
卸载重装解决问题。
后来重启后,一切恢复了,中文又再次无法
export LC_ALL=zh_CN.UTF-8
世界宁静
给命令起别名
alias ls="ls --color"
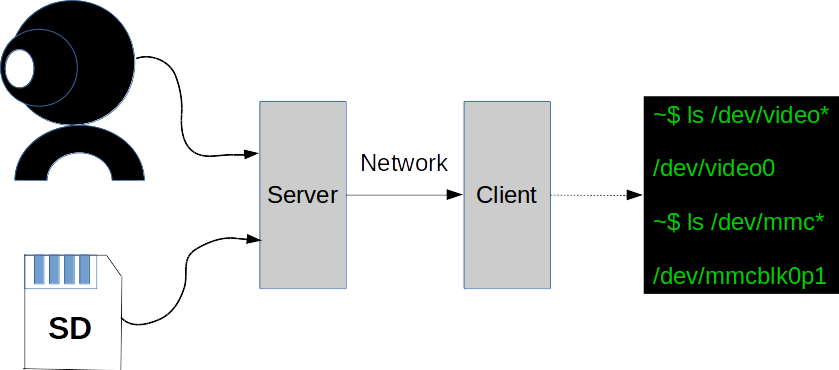
USB over IP
1 |
|
CPU Core
cat /proc/cpuinfo | grep "physical id" | sort | uniq | wc -l
查看进程绑定在哪个CPU
taskset -cp 进程PID
绑定进程到CPU
taskset -cp cpu核序号 进程PID
swap 在windows PC上也有这个功能,就是把硬盘的一部分空间当作内存使用,用来应付内存不足的情况。
该区域也不宜设置过大,否则OS就不会节约使用内存。
/etc/fstab
磁盘被手动挂载之后都必须把挂载信息写入/etc/fstab这个文件中,否则下次开机启动时仍然需要重新挂载。
系统开机时会主动读取/etc/fstab这个文件中的内容,根据文件里面的配置挂载磁盘。
https://blog.csdn.net/kepa520/article/details/81315430
原理是跟踪进程和信号的系统调用
strace cat /dev/null

execve("/usr/bin/cat", ["cat", "/dev/null"], 0x7ffe960fe6b8 /* 26 vars */) = 0
brk(NULL)                               = 0x55f11ab99000
arch_prctl(0x3001 /* ARCH_??? */, 0x7ffebb813ff0) = -1 EINVAL (无效的参数)
access("/etc/ld.so.preload", R_OK)      = -1 ENOENT (没有那个文件或目录)
...


strace -tt -T -v -f -e trace=file -o /data/log/strace.log -s 1024 -p 23489
跟踪nginx, 看其启动时都访问了哪些文件
strace -tt -T -f -e trace=file -o /data/log/strace.log -s 1024 ./nginx
strace也不是真正的万能。当目标进程卡死在用户态时,strace就没有输出了。
这个时候我们需要其他的跟踪手段,比如gdb/perf/SystemTap等。
备注:
1、perf原因kernel支持

2、ftrace  kernel支持可编程

3、systemtap 功能强大,RedHat系统支持,对用户态,内核态逻辑都能探查,使用范围更广
dmesg -s 指定唤醒缓冲器大小
ps -eo pid,args,psr

psr

ps -o pid,psr,comm -p <pid>
TTL
当我们在使用 ping 命令时,返回结果里会带一个 TTL 值。这个东西的含义其实就是Time To Live,指的是报文在网络中能够存活的限制。以前这个限制方式是设定一个时间(Time To Live中的Time就是这样来的),当报文在网络中转发时,时间超过这个限制,最后一个收到报文的路由点就会把它扔掉,而不继续转发。后来把时间限制改为了跳数限制,就是当报文在网络中转发时,每经过一个路由点,就把预先设定的这个TTL数值减 1,直到最后 TTL=1 时报文就被扔掉,不向下转发。
路由点:我这里是指完成路由功能的机器,因为并不是只有路由器才可以完成路由转发功能,比如主机可以配置路由转发。
所以,回包中的 TTL 表示目标主机返回的报文到达本机后,从它预设的 TTL 值减小到现在的值。
临时开启 ping。
echo 0 > /proc/sys/net/ipv4/icmp_echo_ignore_all
临时禁用 ping。
echo 1 > /proc/sys/net/ipv4/icmp_echo_ignore_all
当创建好epoll句柄后,它就是会占用一个fd值,在linux下如果查看/proc/进程id/fd/,是能够看到这个fd的,所以在使用完epoll后,必须调用close()关闭,否则可能导致fd被耗尽。
epoll创建的fd是:
lrwx------ 1 root root 64 Aug 20 11:04 3 -> anon_inode:[eventpoll]
这种类型的inode,是epoll创建的。
lrwx------ 1 root root 64 Aug 20 11:04 4 -> socket:[1126425]
lrwx------ 1 root root 64 Nov 21 09:44 133 -> /dev/sda1
lrwx------ 1 root root 64 Nov 21 09:44 134 -> /dev/sdb1
lrwx------ 1 root root 64 Nov 21 09:44 136 -> /dev/sdb1
lrwx------ 1 root root 64 Nov 21 09:44 137 -> socket:[22460]
lrwx------ 1 root root 64 Nov 21 09:44 138 -> socket:[7326842]
lrwx------ 1 root root 64 Nov 21 09:44 139 -> socket:[7341066]
socket:后面的一串数字是什么呢?
其实是该socket的inode号
alias 别名
vfork 创建的子进程执行的时候,父进程睡眠,子进程退出后,父进程才继续执行。并且父子进程使用的资源是同一块。
git remote set-url –add origin git@github.com.git
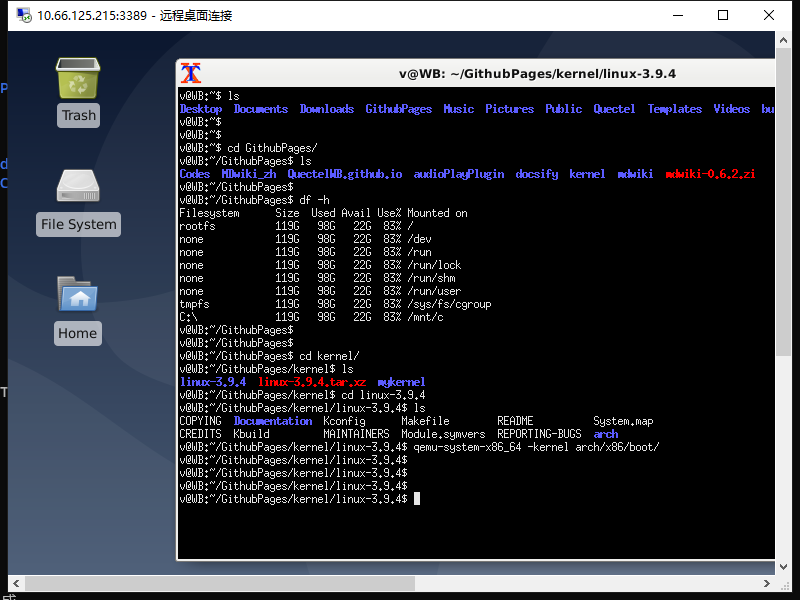
在arm开发板上成功运行Linux系统,我们有如下三个方面的任务:
制作bootloader;
编译linux内核、linux内核模块、linux设备树;
制作根文件系统。
我们使用qemu虚拟机来上手嵌入式linux的开发。
###安装qemu与arm交叉编译工具
略
###Linux内核与设备树编译
下载Linux内核:https://www.kernel.org/
git clone https://mirrors.tuna.tsinghua.edu.cn/git/linux.git
https://mirror.bjtu.edu.cn/kernel/linux/kernel/
make vexpress_defconfig
make zImage
make modules
make dtbs
得到zImage、dtb
尝试启动
1 | qemu-system-arm -M vexpress-a9 -m 512M -kernel arch/arm/boot/zImage -dtb arch/arm/boot/dts/vexpress-v2p-ca9.dtb -nographic -append "console=ttyAMA0" |
看到
1 |
|
###busybox
https://busybox.net/downloads/

编译生成一个 __install 文件夹
###制作根文件系统
mkdir rootfs
将_install 目录里的内容拷贝到rootfs目录中
新建目录 mkdir lib
将arm交叉编译器的库复制过来:cp -r /usr/arm-linux-gnueabi/lib/* lib/
在rootfs目录下新建目录mkdir dev/,进入该目录cd dev/,创建节点sudo mknod -m 666 tty1 c 4 1(串口字符设备,主设备号为4,从设备号为1)
重复创建多个串口设备,注意分配好从设备号:
创建一个控制台节点:mknod -m 666 console c 5 1
创建一个空节点:mknod -m 666 null c 1 3
回到home目录,输入命令dd if=/dev/zero of=rootfs.ext3 bs=1M count=32生成虚拟SD卡系统镜像,可以得到一个rootfs.ext3文件。
格式化该镜像:mkfs.ext3 rootfs.ext3
挂载该镜像到本地:mount -t ext3 rootfs.ext3 /mnt -o loop
将之前准备的rootfs目录下的所有文件都拷贝到该镜像挂载点:cp -r /home/zvcv/rootfs/* /mnt/
卸载:umount /mnt/
进入linux源码目录: cd linux/
使用qemu启动内核:qemu-system-arm -M vexpress-a9 -m 512M -kernel arch/arm/boot/zImage -dtb arch/arm/boot/dts/vexpress-v2p-ca9.dtb -nographic -append “root=/dev/mmcblk0 rw console=ttyAMA0” -sd /home/zvcv/rootfs.ext3,这里比之前多指定了一个sd镜像。
点击回车,进入命令行,linux启动完毕。
我遇到了无法启动,原因是内核编译选项选的是ext4 ,所以格式化的时候选mkfs.ext4
###uboot
https://ftp.denx.de/pub/u-boot/
不要用最新版本
scripts/kconfig/conf –syncconfig Kconfig
UPD include/config.h
GEN include/autoconf.mk.dep
CFG u-boot.cfg
GEN include/autoconf.mk
UPD include/generated/dt.h
UPD include/generated/timestamp_autogenerated.h
UPD include/config/uboot.release
*** Your GCC is older than 6.0 and is not supported
arch/arm/config.mk:66: recipe for target ‘checkgcc6’ failed
make: *** [checkgcc6] Error 1
我的arm-linux-gnuebi-gcc 是5.5
换2015年的uboot才能build pass
###NFS
sudo apt-get install uml-utilities bridge-utils
cd linux-4.4.232/
make LOADADDR=0x60003000 uImage -j4
mkimage command not found U-Boot images will not be built —>
sudo apt-get install u-boot-tools
sudo apt-get install tftp-hpa tftpd-hpa xinetd
u-boot 要能加载uImage,需要修改
默认的bootcmd,变成tftp加载tftp server上的uImage
vim include/configs/vexpress_common.h
注释默认的 CONFIG_BOOTCOMMAND
添加
#define CONFIG_BOOTCOMMAND “tftp 0x60003000 uImage; setenv bootargs’root=/dev/mmcblk0 console=ttyAMA0’; bootm 0x60003000”
另外一个说法是
#define CONFIG_BOOTCOMMAND “tftp 0x60003000 uImage; tftp 0x60500000 vexpress-v2p-ca9.dtb; setenv bootargs ‘root=/dev/mmcblk0 console=ttyAMA0’; bootm 0x60003000 - 0x60500000”
可以配置IP和netmask
1 | #define CONFIG_IPADDR 192.168.1.49 |
在Quectel的台式机虚拟机里的桥接网卡,实际配置成
1 | #define CONFIG_IPADDR 192.168.1.49 |
From
https://linoxide.com/linux-how-to/linux-signals-part-1
https://linoxide.com/linux-how-to/linux-kill-command-examples/
Signals in Linux is a very important concept to understand. This is because signals are used in some of the common activities that you do through Linux command line. For example, whenever you press Ctrl+c to terminate an executing command from command line, you use signals.
Whenever you use ‘kill -9 [pid]’ to kill a process, you use signals. So, it is very useful to know at least the basics of signals and that is exactly what we will discuss in this tutorial.
A signal is nothing but a way of communicating a message from one process to another. These messages are popularly known as notifications which the receiving process is free to process, ignore or leave it up to the OS to take default action (more on these options later). A notification sent by the sender process to the receiving process can be of various types. For example, a notification can be to kill the receiving process or let it know that it has accessed an invalid memory area or it can be a notification of the availability of a resource (that was busy earlier) etc. So, you can see that signals are nothing but just another way of IPC (inter Process Communication).
Signals are important, in-fact very important because they drive some of the most popular programming and system administration activities.
For example, let’s take the example of a debugger. Most of the programmers use a debugger to debug their program code while it is executing. If you would have ever used a debugger, you would know that breakpoints are used to halt the execution of a program at specified lines of code.
What makes a program aware that a breakpoint has been hit and it needs to halt the execution?
Yes, it is a signal (SIGSTOP) that is sent to the program in this case. And when the user is done with debugging, a signal (SIGCONT) is sent to the program – after which the program continues the execution.
###Different Types Of Signals
root@m:/# kill -l

 1) SIGHUP       2) SIGINT       3) SIGQUIT      4) SIGILL       5) SIGTRAP
 6) SIGABRT      7) SIGBUS       8) SIGFPE       9) SIGKILL     10) SIGUSR1
11) SIGSEGV     12) SIGUSR2     13) SIGPIPE     14) SIGALRM     15) SIGTERM
16) SIGSTKFLT   17) SIGCHLD     18) SIGCONT     19) SIGSTOP     20) SIGTSTP
21) SIGTTIN     22) SIGTTOU     23) SIGURG      24) SIGXCPU     25) SIGXFSZ
26) SIGVTALRM   27) SIGPROF     28) SIGWINCH    29) SIGIO       30) SIGPWR
31) SIGSYS      34) SIGRTMIN    35) SIGRTMIN+1  36) SIGRTMIN+2  37) SIGRTMIN+3
38) SIGRTMIN+4  39) SIGRTMIN+5  40) SIGRTMIN+6  41) SIGRTMIN+7  42) SIGRTMIN+8
43) SIGRTMIN+9  44) SIGRTMIN+10 45) SIGRTMIN+11 46) SIGRTMIN+12 47) SIGRTMIN+13
48) SIGRTMIN+14 49) SIGRTMIN+15 50) SIGRTMAX-14 51) SIGRTMAX-13 52) SIGRTMAX-12
53) SIGRTMAX-11 54) SIGRTMAX-10 55) SIGRTMAX-9  56) SIGRTMAX-8  57) SIGRTMAX-7
58) SIGRTMAX-6  59) SIGRTMAX-5  60) SIGRTMAX-4  61) SIGRTMAX-3  62) SIGRTMAX-2
63) SIGRTMAX-1  64) SIGRTMAX
###Difference between SIGTERM, SIGKILL, SIGINT, SIGQUIT
SIGQUIT
On POSIX-compliant platforms, SIGQUIT is the signal sent to a process by its controlling terminal when the user requests that the process perform a core dump. SIGQUIT can usually be induced with Control-. On Linux, one may also use Ctrl-4 or, on the virtual console, the SysRq key.
SIGTERM
SIGTERM is the default signal sent to a process by the kill or killall commands. It causes the termination of a process, but unlike the SIGKILL signal, it can be caught and interpreted (or ignored) by the process. Therefore, SIGTERM is akin to asking a process to terminate nicely, allowing cleanup and closure of files. For this reason, on many Unix systems during shutdown, init issues SIGTERM to all processes that are not essential to powering off, waits a few seconds, and then issues SIGKILL to forcibly terminate any such processes that remain.
SIGINT
On POSIX-compliant platforms, SIGINT is the signal sent to a process by its controlling terminal when a user wishes to interrupt the process. SIGINT is sent when the user on the process’ controlling terminal presses the interrupt the running process key typically Control-C, but on some systems, the “delete” character or “break” key.
SIGKILL
On POSIX-compliant platforms, SIGKILL is the signal sent to a process to cause it to terminate immediately. When sent to a program, SIGKILL causes it to terminate immediately. In contrast to SIGTERM and SIGINT, this signal cannot be caught or ignored, and the receiving process cannot perform any clean-up upon receiving this signal.
How a Program Handles Signals?
A program can handle signals in the following three ways:
A program may provide its own signal handler for handling a particular signal - This is especially important in those cases where a program has to perform some tasks (for example - memory clean-up activities) in response to the received signal. A signal handler is nothing but a function defined in the program code that gets executed automatically (actually it gets triggered by the OS kernel) when a signal is received by the program.
A Program may do nothing on receipt of a signal - Every signal has a default action associated with it. In a scenario where a program just doesn’t care for a signal, the default action corresponding to that particular signal is taken by the OS kernel.
A program may choose to ignore a signal - In this situation, the signal (or set of signals) are blocked and are hence not delivered to the program. A program may choose to ignore signals which – the programmer thinks – are irrelevant to it.
###Examples
http://www.yolinux.com/TUTORIALS/C++Signals.html
1 | #include <unistd.h> |
./adb connect 192.168.1.180:5555
setprop service.adb.tcp.port 5555
stop adbd
start adbd
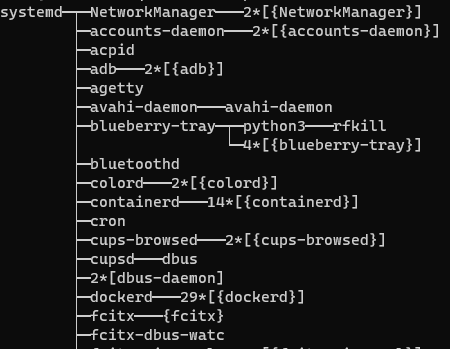
1 | pstree: unrecognized option '--help' |
root@m:/usr/src/linux-headers-5.4.0-26-generic/include# ps -a
PID TTY TIME CMD
2097 pts/0 00:00:00 sudo
2948 pts/1 00:00:00 bash
2969 pts/0 00:00:00 tmux: client
45805 pts/9 00:00:00 ps
root@m:/usr/src/linux-headers-5.4.0-26-generic/include# pidof tmux
2971 2969
命令用于改变根目录
xargs 是一个强有力的命令,它能够捕获一个命令的输出,然后传递给另外一个命令。
somecommand |xargs -item command
-a file 从文件中读入作为sdtin
-e flag ,注意有的时候可能会是-E,flag必须是一个以空格分隔的标志,当xargs分析到含有flag这个标志的时候就停止。
-p 当每次执行一个argument的时候询问一次用户。
-n num 后面加次数,表示命令在执行的时候一次用的argument的个数,默认是用所有的。
-t 表示先打印命令,然后再执行。
-i 或者是-I,这得看linux支持了,将xargs的每项名称,一般是一行一行赋值给 {},可以用 {} 代替。
-r no-run-if-empty 当xargs的输入为空的时候则停止xargs,不用再去执行了。
-s num 命令行的最大字符数,指的是 xargs 后面那个命令的最大命令行字符数。
-L num 从标准输入一次读取 num 行送给 command 命令。
-l 同 -L。
-d delim 分隔符,默认的xargs分隔符是回车,argument的分隔符是空格,这里修改的是xargs的分隔符。
-x exit的意思,主要是配合-s使用。。
-P 修改最大的进程数,默认是1,为0时候为as many as it can ,这个例子我没有想到,应该平时都用不到的吧。
:r
可以把其他文本文件内容插入到当前文件中
systemctl list-units –all –type=service
mv `ls | grep -v src | xargs` src
xargs 将ls 的结果作为一行
grep -v 反向
mv `(ls | grep -v 'example[12]' | xargs)` example1

将除了 example1和example2剩下的所有文件全部移动到example1中去
不挂断地运行命令
nohup cmd &
当前shell关闭后,会将该进程的父进程指向init(PID 1)
show / manipulate traffic control settings
Usage:  tc [ OPTIONS ] OBJECT { COMMAND | help }
        tc [-force] -batch filename
where  OBJECT := { qdisc | class | filter | chain |
                    action | monitor | exec }
       OPTIONS := { -V[ersion] | -s[tatistics] | -d[etails] | -r[aw] |
                    -o[neline] | -j[son] | -p[retty] | -c[olor]
                    -b[atch] [filename] | -n[etns] name | -N[umeric] |
                     -nm | -nam[es] | { -cf | -conf } path }
详细参考 man tc
将 eth0 网卡的传输设置为延迟100毫秒发送。
$ tc qdisc add dev eth0 root netem delay 100ms
延迟值不会这么精确,会有一定的波动,下面命令模拟带有波动性的延迟值:
$ tc  qdisc  add  dev  eth0  root  netem  delay  100ms  10ms

root@m:/home/m/Smart210# tc  qdisc
qdisc noqueue 0: dev lo root refcnt 2
qdisc fq_codel 0: dev eth0 root refcnt 2 limit 10240p flows 1024 quantum 1514 target 5.0ms interval 100.0ms memory_limit 32Mb ecn
qdisc netem 8001: dev wlan0 root refcnt 2 limit 1000 delay 100.0ms
qdisc noqueue 0: dev docker0 root refcnt 2
模拟网络丢包
将 eth0 网卡的传输设置为随机丢掉 1% 的数据包。
$ tc qdisc add dev eth0 root netem loss 1%
模拟数据包损坏\模拟数据包乱序\
设置延时
$ sudo tc qdisc add dev eth0 root netem delay 4s
取消延时
$ sudo tc qdisc del dev eth0 root netem delay 4s
配合iptables 使用
git format-patch -1 d9a64c74ff0244b96a44fa27abcdc411d29f487
shift+V 选中
shift+>
ssh连接路由命令安装
或者用ssh软件PuTTY连接路由器
opkg update
opkg install 软件包网址
或者用winscp连接路由 然后上传包到/tmp/下
opkg update
opkg install /tmp/xxx.ipk
q@q-K501LB:~/Khadas$ du -d 1 -h Android_P/
6.5G    Android_P/external
350M    Android_P/toolchain
1.6G    Android_P/tools
22G     Android_P/prebuilts
144G    Android_P/.repo
84M     Android_P/libcore
912K    Android_P/pdk
329M    Android_P/bootloader
31M     Android_P/sdk
811M    Android_P/common
3.3M    Android_P/compatibility
5.8M    Android_P/platform_testing
124M    Android_P/test
14M     Android_P/build
22M     Android_P/bootable
34M     Android_P/bionic
436M    Android_P/developers
876K    Android_P/kernel
1.7G    Android_P/vendor
1.7G    Android_P/frameworks
404K    Android_P/libnativehelper
131M    Android_P/development
167M    Android_P/device
90M     Android_P/art
553M    Android_P/hardware
691M    Android_P/packages
470M    Android_P/system
779M    Android_P/cts
80G     Android_P/out
27M     Android_P/dalvik
261G    Android_P/
-h 结尾以B K M G为单位,方便阅读。df 命令也一样,也有-h选项
for i in {1..7}
do
        echo $i
done
用bash 执行可以,但是dash 不行
现在在zh分支上,想删除zh分支
  1 先切换到别的分支: git checkout master

  2 删除本地分支: git branch -d zh

  3 如果删除不了可以强制删除,git branch -D zh

  4 有必要的情况下,删除远程分支(慎用):git push origin --delete zh
xxx
当出现 username 的时候,自动输入 QuectelWB.
自动ssh登录输入密码
Shell 脚本如下
#!/usr/bin/expect

spawn ssh m@10.66.125.234
expect "*password:"
send "m\r"
expect "*$"
interact
查找/etc下的链接属性的文件,大小小于1kb的
find /etc -type l -o -size -1k
修改文件所属组群chgrp
修改文件所属组群很简单-chgrp命令,就是change group的缩写(我们可以利用这些来记忆命令)
语法:
chgrp 组群 文件名/目录
相比于chwon 更不常用
android@q-OptiPlex-7070:~/IMX8_Android9$ nslookup www.baidu.com 8.8.8.8
Server:         8.8.8.8
Address:        8.8.8.8#53

Non-authoritative answer:
www.baidu.com   canonical name = www.a.shifen.com.
Name:   www.a.shifen.com
Address: 14.215.177.39
Name:   www.a.shifen.com
Address: 14.215.177.38
:)
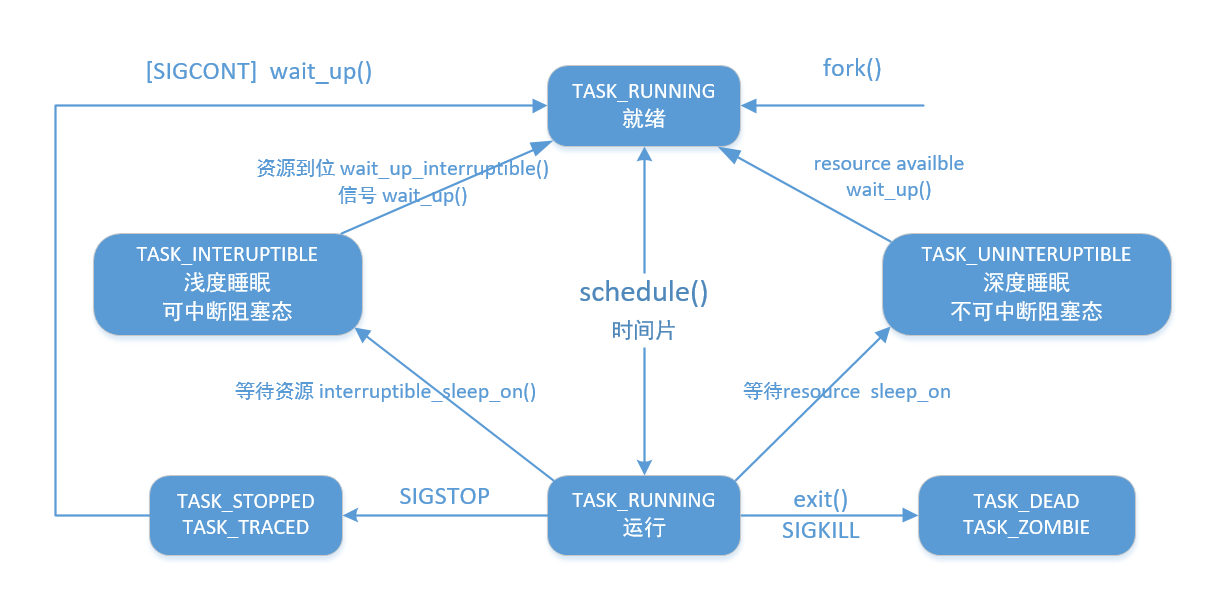
TASK_UNINTERRUPTIBLE 的进程 在ps 的时候能看到标注为 D ,而TASK_INTERRUPTIBLE的进程处于 S状态。
D 状态的程序,譬如 vfork创建子进程后,父进程就是D状态。
D状态的进程,只能 重启操作系统或者等其资源满足后才能关闭。无法用信号操作kill掉。
正常情况,子进程退出,会有SIGCHLD信号通知父进程。一个进程使用fork创建子进程,如果子进程退出,而父进程并没有调用wait或waitpid获取子进程的状态信息,那么子进程的进程描述符仍然保存在系统中。这种进程称之为僵死进程。
孤儿进程:一个父进程退出,而它的一个或多个子进程还在运行,那么那些子进程将成为孤儿进程。孤儿进程将被init进程(进程号为1)所收养,并由init进程对它们完成状态收集工作。
pid_t wait(int *status);
pid_t waitpid(pid_t pid, int *status, int options);
status
WIFEXITED(status)
returns true if the child terminated normally, that is, by calling exit(3) or _exit(2), or by returning from main().
WEXITSTATUS(status)
returns the exit status of the child. This consists of the least significant 8 bits of the status argument that the child specified in a call to exit(3) or _exit(2) or as the argument for a return statement in main(). This macro should only be employed if WIFEXITED returned true.
WIFSIGNALED(status)
returns true if the child process was terminated by a signal.
WTERMSIG(status)
returns the number of the signal that caused the child process to terminate. This macro should only be employed if WIFSIGNALED returned true.
WCOREDUMP(status)
returns true if the child produced a core dump. This macro should only be employed if WIFSIGNALED returned true. This macro is not specified in POSIX.1-2001 and is not available on some UNIX implementations (e.g., AIX, SunOS). Only use this enclosed in #ifdef WCOREDUMP ... #endif.
WIFSTOPPED(status)
returns true if the child process was stopped by delivery of a signal; this is only possible if the call was done using WUNTRACED or when the child is being traced (see ptrace(2)).
WSTOPSIG(status)
returns the number of the signal which caused the child to stop. This macro should only be employed if WIFSTOPPED returned true.
WIFCONTINUED(status)
(since Linux 2.6.10) returns true if the child process was resumed by delivery of SIGCONT.
wsl 支持后台运行
在WSL中创建 /etc/init.wsl
#! /bin/sh
/etc/init.d/cron $1
/etc/init.d/ssh $1
/etc/init.d/supervisor $1
WIN+R
shell:startup
创建Windows系统的启动脚本 debian.vbs
Set ws = CreateObject("Wscript.Shell")
ws.run "wsl -d debian -u root /etc/init.wsl start", vbhide
支持多选项卡、窗格、Unicode、UTF-8和自定义标题、主题、自动补全,支持WSL、PowerShell。
www.github.com/microsoft/terminal
https://docs.microsoft.com/zh-cn/windows/terminal/
###默认快捷键
| 快捷键 | 功能 |
|---|---|
| Shift + Alt + + | 横向分屏 |
| Shift + Alt + - | 竖向分屏 |
| Ctrl + Shift + w | 取消分屏/关闭当前标签页 |
| Alt + 方向键 | 分屏间移动光标 |
| Alt + Shift + 方向键 | 调整当前分屏区大小 |
###settings.json
// 全局设置
{
    "$schema": "https://aka.ms/terminal-profiles-schema",

    "defaultProfile": "{61c54bbd-c2c6-5271-96e7-009a87ff44bf}", // 默认配置文件

    "disabledProfileSources": "[]", // 禁用动态配置文件

    "theme": "system", // 深色/浅色主题

    "alwaysShowTabs": true, // 始终显示选项卡

    "tabWidthMode": "equal", // 选项卡宽度模式

    "confirmCloseAllTabs": true, // 隐藏关闭所有选项卡弹出窗口

    "startOnUserLogin": false, // 在计算机启动时启动

    "launchMode": "default", // 启动大小(窗口)

    "initialPosition": ",", // 启动位置(窗口)

    "initialCols": 120, // 首次启动时的列

    "initialRows": 30, // 首次启动时的行

    "showTabsInTitlebar": true, // 显示/隐藏标题栏

    "showTerminalTitleInTitlebar": true, // 设置标题栏中的文本

    "copyOnSelect": true, // 选择内容后复制

    "copyFormatting": true, // 复制格式

    //"wordDelimiters": "/\()"'-:,.;<>~!@#$%^&*|+=[]{}~?", // 字分隔符

    "rowsToScroll": "system", // 滚动速度

    "snapToGridOnResize": true, // 窗口大小调整行为

    "experimental.rendering.forceFullRepaint": true, // 屏幕重绘

    "experimental.rendering.software": true, // 软件渲染

    // 配置文件
    "profiles":
    {
        // 适用所有配置文件的设置
    "defaults":
    {
            "startingDirectory": "%USERPROFILE%", // 起始目录

            "icon": "D:\\QuectelLogo.png", // 图标

            "tabTitle": "BiaoNeverSurrender", // 自定义选项卡标题

            "suppressApplicationTitle": true, // 禁止shell更改标题

            "fontFace": "Fira Code Retina", // 字体

            "fontSize": 12, // 字体大小

            "fontWeight": "normal", // 字体粗细

            "padding": "8, 8, 8, 8", // 填充(内容距离界面的内部距离)

            "antialiasingMode": "cleartype", // 消除文本锯齿

            "cursorShape": "bar", // 光标形状

            "cursorColor": "#E6FF00", // 光标颜色

            //"cursorHeight": 25, // 光标高度("cursorShape"设置为"vintage"时可用)

            "altGrAliasing": true, // AltGr别名

            "colorScheme": "Ubuntu", // 配色方案

            //"selectionBackground": "#0000e6", // 所选内容的背景色(选用"colorScheme"内的)

            "useAcrylic": true, // 启用 acrylic(毛玻璃特效)

            "acrylicOpacity": 0.9, // Acrylic 不透明度

            "backgroundImage": "C:\\Users\\DustinWinFiles\\Pictures\\colorful.jpg", // 背景图像设置

            "backgroundImageStretchMode": "uniformToFill", // 背景图像拉伸模式

            "backgroundImageAlignment": "center", // 背景图像对齐

            "backgroundImageOpacity": 0.5, // 背景图像不透明度

            "scrollbarState": "visible", // 滚动条可见性

            "snapOnInput": true, // 键入时滚动到输入行

            "historySize": 9001, // 历史记录大小

            "closeOnExit": "graceful", // 退出时配置文件的关闭方式(输入exit退出命令窗口)

            //"experimental.retroTerminalEffect": false // 怀旧式终端效果

            "alwaysOnTop": true // 始终处于顶部模式
    },

        // 配置文件列表
    "list":
    [
        {
        "guid": "{61c54bbd-c2c6-5271-96e7-009a87ff44bf}", // PowerShell唯一标识符

        "name": "Windows PowerShell", // 名称

        "commandline": "powershell.exe", // 命令行

        "hidden": false // 隐藏下拉列表中的某个配置文件
        },
        {
        "guid": "{0caa0dad-35be-5f56-a8ff-afceeeaa6101}", // CMD唯一标识符

        "name": "命令提示符", // 名称

        "commandline": "cmd.exe", // 命令行

        "hidden": false // 隐藏下拉列表中的某个配置文件
        },
        {
        "guid": "{b453ae62-4e3d-5e58-b989-0a998ec441b8}", // Azure Cloud Shell唯一标识符

        "hidden": true, // 隐藏下拉列表中的某个配置文件

        "name": "Azure Cloud Shell", // 名称

        "source": "Windows.Terminal.Azure" // 源
        },
        {
        "guid": "{07b52e3e-de2c-5db4-bd2d-ba144ed6c273}",
        "hidden": false,
        "name": "Ubuntu-20.04",
        "source": "Windows.Terminal.Wsl"
        },
        {
        "guid": "{6f9994f0-4403-5e85-9cce-98e5da3839bb}",
        "hidden": false,
        "name": "Ubuntu-16.04",
        "source": "Windows.Terminal.Wsl"
        }
    ]
    },

    // 主题(配色方案)
    "schemes": [
        {
          "name": "Ubuntu",

          "black": "#2e3436",

          "red": "#cc0000",

          "green": "#4e9a06",

          "yellow": "#c4a000",

          "blue": "#3465a4",

          "purple": "#75507b",

          "cyan": "#06989a",

          "white": "#d3d7cf",

          "brightBlack": "#555753",

          "brightRed": "#ef2929",

          "brightGreen": "#8ae234",

          "brightYellow": "#fce94f",

          "brightBlue": "#729fcf",

          "brightPurple": "#ad7fa8",

          "brightCyan": "#34e2e2",

          "brightWhite": "#eeeeec",

          "background": "#300a24", // 背景色

          "foreground": "#eeeeec" // 前景色
        }
    ],

    // 按键绑定
    "keybindings":
    [
        { "command": "closeWindow", "keys": "alt+f4" }, // 关闭窗口

        { "command": "find", "keys": "ctrl+shift+f" }, // 查找

        { "command": "openSettings", "keys": "ctrl+," }, // 打开设置文件

        { "command": { "action": "openSettings", "target": "defaultsFile" }, "keys": "ctrl+alt+," }, // 打开设置文件

        { "command": "toggleFullscreen", "keys": "alt+enter" }, // 切换全屏

        { "command": "toggleFullscreen", "keys": "f11" }, // 切换全屏

        { "command": "closeTab", "keys": "ctrl+alt+f4" }, // 关闭选项卡

        { "command": "duplicateTab", "keys": "ctrl+shift+d" }, // 复制选项卡

        { "command": "newTab", "keys": "ctrl+shift+t" }, // 新建选项卡

        { "command": { "action": "newTab", "index": 0 }, "keys": "ctrl+shift+1" }, // 新建选项卡

        { "command": { "action": "newTab", "index": 1 }, "keys": "ctrl+shift+2" }, // 新建选项卡

        { "command": { "action": "newTab", "index": 2 }, "keys": "ctrl+shift+3" }, // 新建选项卡

        { "command": { "action": "newTab", "index": 3 }, "keys": "ctrl+shift+4" }, // 新建选项卡

        { "command": { "action": "newTab", "index": 4 }, "keys": "ctrl+shift+5" }, // 新建选项卡

        { "command": { "action": "newTab", "index": 5 }, "keys": "ctrl+shift+6" }, // 新建选项卡

        { "command": { "action": "newTab", "index": 6 }, "keys": "ctrl+shift+7" }, // 新建选项卡

        { "command": { "action": "newTab", "index": 7 }, "keys": "ctrl+shift+8" }, // 新建选项卡

        { "command": { "action": "newTab", "index": 8 }, "keys": "ctrl+shift+9" }, // 新建选项卡

        { "command": "nextTab", "keys": "ctrl+tab" }, // 打开下一个选项卡

        { "command": "prevTab", "keys": "ctrl+shift+tab" }, // 打开上一个选项卡

        { "command": { "action": "switchToTab", "index": 0 }, "keys": "ctrl+alt+1" }, // 打开特定的选项卡

        { "command": { "action": "switchToTab", "index": 1 }, "keys": "ctrl+alt+2" }, // 打开特定的选项卡

        { "command": { "action": "switchToTab", "index": 2 }, "keys": "ctrl+alt+3" }, // 打开特定的选项卡

        { "command": { "action": "switchToTab", "index": 3 }, "keys": "ctrl+alt+4" }, // 打开特定的选项卡

        { "command": { "action": "switchToTab", "index": 4 }, "keys": "ctrl+alt+5" }, // 打开特定的选项卡

        { "command": { "action": "switchToTab", "index": 5 }, "keys": "ctrl+alt+6" }, // 打开特定的选项卡

        { "command": { "action": "switchToTab", "index": 6 }, "keys": "ctrl+alt+7" }, // 打开特定的选项卡

        { "command": { "action": "switchToTab", "index": 7 }, "keys": "ctrl+alt+8" }, // 打开特定的选项卡

        { "command": { "action": "switchToTab", "index": 8 }, "keys": "ctrl+alt+9" }, // 打开特定的选项卡

        { "command": "closePane", "keys": "ctrl+shift+w" }, // 关闭窗格

        { "command": { "action": "moveFocus", "direction": "down" }, "keys": "alt+down" }, // 移动窗格焦点

        { "command": { "action": "moveFocus", "direction": "left" }, "keys": "alt+left" }, // 移动窗格焦点

        { "command": { "action": "moveFocus", "direction": "right" }, "keys": "alt+right" }, // 移动窗格焦点

        { "command": { "action": "moveFocus", "direction": "up" }, "keys": "alt+up" }, // 移动窗格焦点

        { "command": { "action": "resizePane", "direction": "down" }, "keys": "alt+shift+down" }, // 调整窗格大小

        { "command": { "action": "resizePane", "direction": "left" }, "keys": "alt+shift+left" }, // 调整窗格大小

        { "command": { "action": "resizePane", "direction": "right" }, "keys": "alt+shift+right" }, // 调整窗格大小

        { "command": { "action": "resizePane", "direction": "up" }, "keys": "alt+shift+up" }, // 调整窗格大小

        { "command": { "action": "splitPane", "split": "auto", "splitMode": "duplicate" }, "keys": "alt+shift+d" }, // 拆分窗格

        { "command": { "action": "splitPane", "split": "horizontal"}, "keys": "alt+shift+-" }, // 拆分窗格

        { "command": { "action": "splitPane", "split": "vertical"}, "keys": "alt+shift+plus" }, // 拆分窗格

        { "command": { "action": "copy", "singleLine": false }, "keys": "ctrl+c" }, // 复制

        { "command": { "action": "copy", "singleLine": false }, "keys": "ctrl+shift+c" }, // 复制

        { "command": { "action": "copy", "singleLine": false }, "keys": "ctrl+insert" }, // 复制

        { "command": "paste", "keys": "ctrl+v" }, // 粘贴

        { "command": "paste", "keys": "ctrl+shift+v" }, // 粘贴

        { "command": "paste", "keys": "shift+insert" }, // 粘贴

        { "command": "scrollUp", "keys": "ctrl+shift+up" }, // 向上滚动

        { "command": "scrollDown", "keys": "ctrl+shift+down" }, // 向下滚动

        { "command": "scrollUpPage", "keys": "ctrl+shift+pgup" }, // 向上滚动一整页

        { "command": "scrollDownPage", "keys": "ctrl+shift+pgdn" }, // 向下滚动一整页

        { "command": { "action": "adjustFontSize", "delta": 1 }, "keys": "ctrl+=" }, // 调整字号

        { "command": { "action": "adjustFontSize", "delta": -1 }, "keys": "ctrl+-" }, // 调整字号

        { "command": "resetFontSize", "keys": "ctrl+0" }, // 重置字号

        //{ "command": "unbound", "keys": "ctrl+q" } // 取消绑定键

        { "command": "toggleFocusMode", "keys": "shift+f11" }, // 对焦模式

        { "command": "toggleAlwaysOnTop", "keys": "alt+shift+tab" }, // 始终处于顶部模式

        { "command": { "action": "setTabColor", "color": "#ffffff" }, "keys": "ctrl+a" }, // 设置选项卡颜色

        { "command": "openTabColorPicker", "keys": "ctrl+b" }, // 打开选项卡颜色选取器

        { "command": "renameTab", "keys": "ctrl+c" }, // 重命名选项卡

        { "command": "toggleRetroEffect", "keys": "ctrl+d" }, // 切换复古终端效果

        { "command": "commandPalette", "keys": "ctrl+shift+p" } // 命令调色板
    ]
}
ctags的功能:扫描指定的源文件,找出其中所包含的语法元素,并将找到的相关内容记录下来。
####1 查看ctags支持的语言
ctags –list-languages
####2 查看语言和扩展名的对应关系
ctags –list-maps
####3 查看ctags可以识别和记录的语法元素
ctags –list-kinds
单独查看可以识别的C++的语法元素:
[chuxing@hostname ~]$ ctags --list-kinds=c++
c  classes
d  macro definitions
e  enumerators (values inside an enumeration)
f  function definitions
g  enumeration names
l  local variables [off]
m  class, struct, and union members
n  namespaces
p  function prototypes [off]
s  structure names
t  typedefs
u  union names
v  variable definitions
x  external and forward variable declarations [off]
ctags -R *
缺点很明显,tags会非常大,tags生成会非常慢,而且代码跳转会卡顿。
ctags find -name "*.h"
tag命令
用于跳转到指定的tag。例如:
tag tagname
使用这个命令可以跳转到tagname的定义处,即使它在另一个文件中。
快捷键Ctrl+]
取出当前光标下的word作为tag的名字并进行跳转。
tags命令
列出曾经访问过的tag的列表
快捷键Ctrl+T
跳转到前一次的tag处。
stag命令
stag tagname
分割当前窗口,并且跳转到指定的tag。
快捷键Ctrl+W+]
分割当前窗口,并且跳转到光标下的tag。
同名tag
如果存在多个同名的tag,tag命令会给出一个tag的列表,可以通过键入tag的序号来选择tag;也可以通过tselect来过滤tag,如::tselect tagname
如果要在多个tag间移动,可以使用如下命令:
:tfirst             go to first match
:[count]tprevious   go to [count] previous match
:[count]tnext       go to [count] next match
:tlast              go to last match
如果没有指定[count],默认是1。
如果是多个tags文件,可以通过设置tags选项来引入更多的tags文件。例如: :set tags=./tags, ./../tags, ./*/tags
使用tag命令时,可以输入部分tag名,然后使用Tab键进行补全。
使用Vim打开文件时,可以通过参数-On 或 -on来启动分屏。
n 代表整数,表示将整个屏幕分成n部分
大写 O 表示进行垂直方向分屏,小写 o 表示水平方向进行分屏
使用Vim打开文件后,仍然可以在尾行模式通过以下命令进行屏幕分割
垂直分屏并打开一个新文件
:vsplit filename 或缩写形式 :vsp filename
v 表示单词 vertical,是中文垂直的意思
水平分屏并打开一个新文件
Vim尾行模式下执行命令 :split filename 或缩写形式 :sp filename
垂直分隔当前打开的文件
Vim命令行模式下执行命令 Ctrl+w v 可将当前打开的文件进行垂直分割
上述命令 Ctrl+w v 的意思是:先同时按键 Ctrl 和 w,再按键 v
水平分隔当前打开的文件
ctrl+w s 可将当前打开的文件进行水平方向分割
上述命令 Ctrl+w s 表示先同时按键 Ctrl 和 w,再按键 s
命令 Ctrl+w = 表示设置所有的分屏幕都有相同的高度

命令 Ctrl+w + 用于增加当前屏幕的高度

命令 Ctrl+w - 用于减少当前屏幕的高度
ctrl +w c
vim 中执行命令
:!ls
sudo apt-get update && sudo apt-get upgrade -y && sudo apt-get upgrade -y && sudo apt-get dist-upgrade -y && sudo apt-get autoremove -y

sudo apt-get install xorg

sudo apt-get install xfce4

sudo apt-get install xrdp

sudo sed -i s/port=3365/port=3365/g /etc/xrdp/xrdp.ini

sudo echo xfce4-session >~/.xsession

sudo service xrdp restart


[....]Restarting Remote Desktop Protocol server: xrdp-sesman xrdp
[20201124-19:34:09] [DEBUG] Testing if xrdp can listen on 0.0.0.0 port 3389.
[20201124-19:34:09] [DEBUG] Closed socket 6 (AF_INET6 :: port 3389)
. ok


远程登录 $(IP):3389
It works.
window10 玩转unbuntu 子系统安装WSL 图形界面,远程桌面
:)
Welcome to Hexo! This is your very first post. Check documentation for more info. If you get any problems when using Hexo, you can find the answer in troubleshooting or you can ask me on GitHub.
1 | $ hexo new "My New Post" |
More info: Writing
1 | $ hexo server |
More info: Server
1 | $ hexo generate |
More info: Generating
1 | $ hexo deploy |
More info: Deployment
1 | # 安装编译工具 |
- 注意:不要使用root用户编译,最好使用梯子来加速源码的下载速度
- 编译完成后把bin/targets/brcm27xx/bcm2711/openwrt-bcm27xx-bcm2711-rpi-4-ext4-factory.img.gz解压后的img文件刷入SD卡中即可
- 可选lean版魔改源码替换官方源码:https://github.com/coolsnowwolf/lede
1 | # 设置代理来加速源码下载,没有代理可跳过或根据需求设置 |
1 | # 额外配置内核参数,一般不需要配置 |
简单的make menuconfig参数配置,除必选配置外的其他项可根据需求自行选择
基础配置
1 | # 必选配置 |
1 | # 文件系统 |
1 | # LuCI设置 |
1 | Network -> Download Manager -> ariang # Aria2管理页面 |
1 | Global build settings -> Enable IPv6 support in packages # 启用IPv6项 |
用网线连接自己的电脑和树莓派,LEDE默认的IP为静态 192.168.1.1,可以将电脑网卡设置为静态IP:192.168.1.2 来访问树莓派上的LEDE管理界面。
设置2.4G无线:网络 -> 无线 选项卡中点修改,基本设置中设置为Legacy模式,频宽2.4GHz和信道自选(切勿使用自动信道和自动频宽),高级设置中国家代码AU。接口配置中模式:接入点AP,网络:lan,然后设置无线安全加密WPA2-PSK和密码等,其余默认即可。
设置5G无线:网络 -> 无线 选项卡中点修改,基本设置中设置为AC模式,只能使用36信道和频宽为20Mhz或者40Mhz才能用作AP(切勿使用自动信道和自动频宽),高级设置中国家代码AU。接口配置中模式:接入点AP,网络:lan,然后设置无线安全加密WPA2-PSK和密码等,其余默认即可。
设置WAN口 网络 -> 接口 选项卡中添加一个新接口命名为”wan”,协议根据自己的网络情况自行选择(我的是DHCP客户端),在 物理设置 中单选接口为eth0,先保存但别应用。设置LAN口 网络 -> 接口 选项卡中编辑lan网卡的物理设置,在无线网络和自定义接口上打上钩填上”eth0.1”, 并取消原本eth0前的钩后保存。
在openwrt目录下新建一个名为files的文件夹,openwrt在编译的时候,会把files文件夹里的文件编译到固件的根目录。
在files/etc/config/中新建两个文件:network,wireless内容如下用来分别配置接口和无线
1 | # openwrt/files/etc/config/network |
1 | # openwrt/files/etc/config/wireless |
cat /sys/class/thermal/thermal_zone0/temp 查看CPU温度#invalid users = rootexport PATH=/usr/local/sbin:/usr/local/bin:/usr/sbin:/usr/bin:/sbin:/bin.config 文件中内核的选项都是形如 CONFIG_KERNEL_XXX 。自己手动添加内核选项时不要忘了在中间添加 _KERNEL_ 前缀。export GO111MODULE=on 和 export GOPROXY=https://goproxy.cn1 | go: github.com/armon/go-socks5@v0.0.0-20160902184237-e75332964ef5: Get "https://proxy.golang.org/github.com/armon/go-socks5/@v/v0.0.0-20160902184237-e75332964ef5.mod": dial tcp 172.217.27.145:443: connect: connection refused |