OverView
https://www.w3school.com.cn/、https://www.runoob.com/ 、https://www.sololearn.com/ 用来学习入门级的编程基础,是非常不错的。最推荐sololearn,尤其是英语一般的又希望英语也不落下的。
可惜的是 国内访问不了sololearn
Markdown
Markdown 支持许多HTML 5标签。—> 这和Markdown的解释器有关
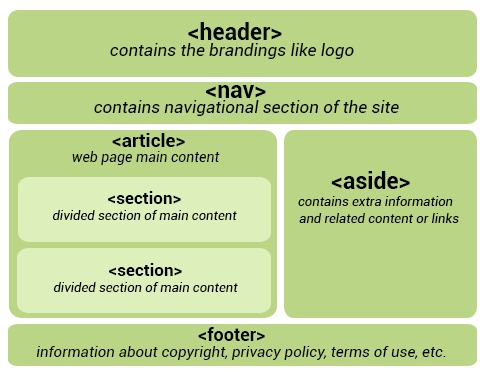
Vincent 长庚
测试了下,支持article 和 aside 标签
博客系统
Apache (Web服务器)
apache和httpd是一个,到apache2后就叫httpd了。
NginX
Nginx(“engine x”)是一款开发高性能的Web和反向代理服务器,也是一个IMAP/POP3/SMTP代理服务器。
DOM
DOM
DOM
定义了访问 HTML 和 XML 文档的标准
1
2
3
4
5
6
7
8
9
10
11
12
13
14
15
| <!DOCTYPE html>
<html>
<body>
<p id="intro">Helweelo World!</p>
<p id="me">本例演示 <b>getElementById</b> 方法!</p>
<script>
x=document.getElementById("me");
document.write("<p>来自 intro 段落的文本:" + x.innerHTML + "</p>");
</script>
</body>
</html>
|
| 方法 |
描述 |
| getElementById() |
返回带有指定 ID 的元素。 |
| getElementsByTagName() |
返回包含带有指定标签名称的所有元素的节点列表(集合/节点数组)。 |
| getElementsByClassName() |
返回包含带有指定类名的所有元素的节点列表。 |
| appendChild() |
把新的子节点添加到指定节点。 |
| removeChild() |
删除子节点。 |
| replaceChild() |
替换子节点。 |
| insertBefore() |
在指定的子节点前面插入新的子节点。 |
| createAttribute() |
创建属性节点。 |
| createElement() |
创建元素节点。 |
| createTextNode() |
创建文本节点。 |
| getAttribute() |
返回指定的属性值。 |
| setAttribute() |
把指定属性设置或修改为指定的值。 |
innerHTML 属性
innerHTML 属性可用于获取或改变任意 HTML 元素,包括 和
。
1
2
3
4
5
6
7
8
9
10
11
12
13
14
15
16
17
18
19
20
| <!DOCTYPE html>
<html>
<body>
<p>Hello World!</p>
<p>DOM 很有用!</p>
<p>本例演示 <b>getElementsByTagName</b> 方法。</p>
<script>
x=document.getElementsByTagName("p");
document.write("第一段的文本: " + x[0].innerHTML);
document.write("第一段的文本: " + x[1].innerHTML);
document.write("第一段的文本: " + x[2].innerHTML);
</script>
</body>
</html>
|
1
2
3
4
5
6
7
8
9
10
11
12
13
14
15
16
17
18
19
| <!DOCTYPE html>
<html>
<body>
<p>Hello World!</p>
<div id="main">
<p>DOM 很有用!</p>
<p>本例演示 <b>getElementsByTagName</b> 方法。</p>
</div>
<script>
x=document.getElementById("main").getElementsByTagName("p");
document.write("div 中的第一段的文本: " + x[0].innerHTML);
</script>
</body>
</html>
|
修改
1
2
3
4
5
6
7
8
9
10
11
12
13
14
15
16
17
18
19
20
21
22
23
24
25
26
| <!DOCTYPE html>
<html>
<body>
<p id="p1">Hello World!</p>
<p id="p2">Hello world!</p>
<script>
document.getElementById("p1").innerHTML="New text!";
</script>
<script>
document.getElementById("p2").style.color="blue";
</script>
<script>
var para=document.createElement("p");
var node=document.createTextNode("This is new.");
para.appendChild(node);
var element=document.getElementById("d1");
element.appendChild(para);
</script>
</body>
</html>
|
事件
导航
HTML5
- HTML5 的<header>和html4的<head>标签是完全不一样的
- article可以取代 div
1
2
3
4
5
6
7
8
9
10
11
12
13
14
15
16
17
18
19
20
21
22
23
24
| <!DOCTYPE html>
<html>
<body>
<p id="demo">点击这个按钮,获得您的坐标:</p>
<button onclick="getLocation()">试一下</button>
<script>
var x=document.getElementById("demo");
function getLocation()
{
if (navigator.geolocation)
{
navigator.geolocation.getCurrentPosition(showPosition);
}
else{x.innerHTML="Geolocation is not supported by this browser.";}
}
function showPosition(position)
{
x.innerHTML="Latitude: " + position.coords.latitude +
"<br />Longitude: " + position.coords.longitude;
}
</script>
</body>
</html>
|
CSS
JavaScript
BootStrap
CSS
GitBook
GitBook 是一个基于 Node.js 的命令行工具,可使用 Github/Git 和 Markdown 来制作精美的电子书
Learn JavaScript
How to Make an Operating System
GitBook入门
GitBook支持输出多种文档格式:
静态站点:GitBook默认输出该种格式,生成的静态站点可直接托管搭载Github Pages服务上;
PDF:需要安装gitbook-pdf依赖;
eBook:需要安装ebook-convert;
单HTML网页:支持将内容输出为单页的HTML,不过一般用在将电子书格式转换为PDF或eBook的中间过程;
JSON:一般用于电子书的调试或元数据提取。
使用GitBook制作电子书,必备两个文件:README.md和SUMMARY.md。
HTML
DOM
DOM
DOM
定义了访问 HTML 和 XML 文档的标准
1
2
3
4
5
6
7
8
9
10
11
12
13
14
15
| <!DOCTYPE html>
<html>
<body>
<p id="intro">Helweelo World!</p>
<p id="me">本例演示 <b>getElementById</b> 方法!</p>
<script>
x=document.getElementById("me");
document.write("<p>来自 intro 段落的文本:" + x.innerHTML + "</p>");
</script>
</body>
</html>
|
| 方法 |
描述 |
| getElementById() |
返回带有指定 ID 的元素。 |
| getElementsByTagName() |
返回包含带有指定标签名称的所有元素的节点列表(集合/节点数组)。 |
| getElementsByClassName() |
返回包含带有指定类名的所有元素的节点列表。 |
| appendChild() |
把新的子节点添加到指定节点。 |
| removeChild() |
删除子节点。 |
| replaceChild() |
替换子节点。 |
| insertBefore() |
在指定的子节点前面插入新的子节点。 |
| createAttribute() |
创建属性节点。 |
| createElement() |
创建元素节点。 |
| createTextNode() |
创建文本节点。 |
| getAttribute() |
返回指定的属性值。 |
| setAttribute() |
把指定属性设置或修改为指定的值。 |
innerHTML 属性
innerHTML 属性可用于获取或改变任意 HTML 元素,包括 和
。
1
2
3
4
5
6
7
8
9
10
11
12
13
14
15
16
17
18
19
20
| <!DOCTYPE html>
<html>
<body>
<p>Hello World!</p>
<p>DOM 很有用!</p>
<p>本例演示 <b>getElementsByTagName</b> 方法。</p>
<script>
x=document.getElementsByTagName("p");
document.write("第一段的文本: " + x[0].innerHTML);
document.write("第一段的文本: " + x[1].innerHTML);
document.write("第一段的文本: " + x[2].innerHTML);
</script>
</body>
</html>
|
1
2
3
4
5
6
7
8
9
10
11
12
13
14
15
16
17
18
19
| <!DOCTYPE html>
<html>
<body>
<p>Hello World!</p>
<div id="main">
<p>DOM 很有用!</p>
<p>本例演示 <b>getElementsByTagName</b> 方法。</p>
</div>
<script>
x=document.getElementById("main").getElementsByTagName("p");
document.write("div 中的第一段的文本: " + x[0].innerHTML);
</script>
</body>
</html>
|
修改
1
2
3
4
5
6
7
8
9
10
11
12
13
14
15
16
17
18
19
20
21
22
23
24
25
26
| <!DOCTYPE html>
<html>
<body>
<p id="p1">Hello World!</p>
<p id="p2">Hello world!</p>
<script>
document.getElementById("p1").innerHTML="New text!";
</script>
<script>
document.getElementById("p2").style.color="blue";
</script>
<script>
var para=document.createElement("p");
var node=document.createTextNode("This is new.");
para.appendChild(node);
var element=document.getElementById("d1");
element.appendChild(para);
</script>
</body>
</html>
|
wiki blog
整理wiki blog的方法
jekyll
hexo
docsify
mdwiki
gitbook
gitbook
gitbook
npm install -g cnpm
cnpm install -g gitbook-cli
docker start gitbook
docker search -s 3 gitbook
docker pull fellah/gitbook
docker run -v /home/m/gitbook/my:/srv/gitbook -v /home/m/gitbook/my/html:/srv/html fellah/gitbook gitbook build . /srv/html
docker search -s 3 nginx
docker pull nginx
docker run –name my-nginx -v /home/m/gitbook/my/html:/usr/share/nginx/html -d -p 8080:80 nginx
So open IP:8080 to start a Web page .
How to make pdf
make pdf
p python -m SimpleHTTPServer
nohup python -m SimpleHTTPServer [port] &
SimpleHTTPServer is a module of Python.
The index.html will should be set as the homepage.
This is also a good idea to share your files.
If there isn’t an index.html page, there will shows all the files in the browser page.
:)